Authentication Overview
The myDevices API uses OAuth2 for secure authentication and authorization. Understanding which authentication flow to use is essential for successful API integration.
Two Authentication Types
The myDevices platform provides two distinct authentication mechanisms, each designed for different use cases:
1. Admin-Level Authentication
Use for: Cross-user operations, white label management, and billing integration
Admin-level authentication gives you access to data across your entire white label application. This is ideal for:
- Querying all companies, locations, and users
- Monitoring devices across all customers
- Integrating with billing systems
- Generating cross-customer reports
- Managing white label application settings
Authentication Method: OAuth2 Client Credentials Flow
Endpoints: /v1.0/admin/* routes
Required: Client ID and Client Secret
Learn more about Admin Authentication →
2. User-Level Authentication
Use for: User-specific data access and operations
User-level authentication allows you to access data as if you were a specific user. This is required for:
- Accessing individual user's device readings
- Querying user-specific reports
- Managing user's alert configurations
- Performing operations that require user context
Authentication Method: OAuth2 Resource Owner Password Credentials Flow
Endpoints: All non-admin routes (everything outside /v1.0/admin/*)
Required: Separate Client ID, Client Secret, Username (email), and Password
User-level authentication requires different Client ID and Client Secret credentials than admin-level authentication. These credentials must be requested through your support team or account manager.
Learn more about User Authentication →
Quick Comparison
| Feature | Admin Authentication | User Authentication |
|---|---|---|
| OAuth Flow | Client Credentials | Resource Owner Password |
| Data Scope | All users in application | Single user only |
| Auth URL | https://auth.mydevices.com/auth/realms/{REALM}/... | https://api.mydevices.com/v1.0/oauth/token |
| Credentials Needed | Client ID + Secret (from console) | Separate Client ID + Secret (request via support) + User Email + Password |
| Token Includes User ID | No | Yes |
| Typical Use Case | Backend services, admin panels | User-facing applications, dashboards |
Admin-Level Authentication Details
Obtaining Your API Credentials
Before you can authenticate, you need to obtain your API credentials from the myDevices console:
- Log into your account on the myDevices console
- Select the Admin API option from the menu
- Navigate to the API section
- Click the Show button to reveal your Client Secret
- Make note of the following fields:
- Realm (e.g.,
your-realm-name) - Client ID (e.g.,
your-client-id) - Client Secret (e.g.,
abc123...)
- Realm (e.g.,
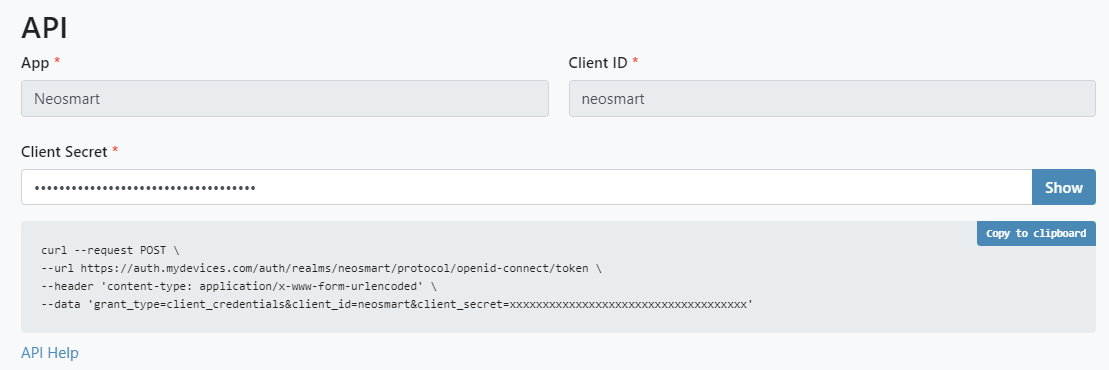
Getting an Admin Access Token
Use the OAuth2 Client Credentials flow to obtain an admin-level access token:
curl --request POST \
  --url https://auth.mydevices.com/auth/realms/YOUR_REALM/protocol/openid-connect/token \
  --header 'content-type: application/x-www-form-urlencoded' \
  --data 'grant_type=client_credentials&client_id=YOUR_CLIENT_ID&client_secret=YOUR_CLIENT_SECRET'
Replace these values:
YOUR_REALM- Your realm name from the consoleYOUR_CLIENT_ID- Your client ID from the consoleYOUR_CLIENT_SECRET- Your client secret from the console
You can copy the complete authentication command directly from the API tab in the console - it has all values pre-populated for you!
Example Response
{
  "access_token": "eyJhbGciOiJIUzI1NiIsInR5cCIgOiAiSldUIiwia2lkIiA6ICI3Y...",
  "expires_in": 86400,
  "refresh_expires_in": 172800,
  "refresh_token": "eyJhbGciOiJIUzI1NiIsInR5cCIgOiAiSldUIiwia2lkIiA6ICI3Y...",
  "token_type": "bearer",
  "not-before-policy": 0,
  "session_state": "91322891-2662-4b3c-8655-9214a7596e2c",
  "scope": "profile email"
}
The access_token is valid for 86400 seconds (24 hours) and should be included in the Authorization header for all subsequent API requests.
Using the Access Token
Include the access token in the Authorization header of your API requests:
curl --request GET \
  --url https://api.mydevices.com/v1.0/admin/companies \
  --header 'Authorization: Bearer YOUR_ACCESS_TOKEN' \
  --header 'Content-Type: application/json'
Common Authentication Patterns
Pattern 1: Backend Service with Admin Access
Scenario: A billing system that needs to query all customers
# 1. Authenticate with admin credentials
ADMIN_TOKEN=$(curl --request POST \
  --url https://auth.mydevices.com/auth/realms/mycompany/protocol/openid-connect/token \
  --header 'content-type: application/x-www-form-urlencoded' \
  --data 'grant_type=client_credentials&client_id=billing-service&client_secret=secret123' \
  | jq -r '.access_token')

# 2. Query all companies
curl --request GET \
  --url https://api.mydevices.com/v1.0/admin/companies \
  --header "Authorization: Bearer ${ADMIN_TOKEN}"
Pattern 2: User Dashboard with User-Specific Data
Scenario: A web application showing a user's device data
# 1. Authenticate as the user
USER_TOKEN=$(curl --request POST \
  --url https://api.mydevices.com/v1.0/oauth/token \
  --header 'content-type: application/x-www-form-urlencoded' \
  --data 'grant_type=password&client_id=dashboard-app&client_secret=secret456&username=user@example.com&password=userpass' \
  | jq -r '.access_token')

# 2. Get user's device readings
curl --request GET \
  --url https://api.mydevices.com/v1.0/things/device-id-123/readings?start_ts=0&end_ts=0 \
  --header "Authorization: Bearer ${USER_TOKEN}"
Pattern 3: Hybrid Approach
Scenario: An admin panel that shows company info and drills down into user data
# 1. Use admin token to get company info
curl --request GET \
  --url https://api.mydevices.com/v1.0/admin/companies/123 \
  --header "Authorization: Bearer ${ADMIN_TOKEN}"

# 2. Get user_id from company response, then switch to user token
# (Obtain user token as shown in Pattern 2)

# 3. Use user token for detailed readings
curl --request GET \
  --url https://api.mydevices.com/v1.0/things/device-id/readings \
  --header "Authorization: Bearer ${USER_TOKEN}"
Token Management Best Practices
Token Expiration
Both admin and user tokens expire after 24 hours (86400 seconds). Plan your token management strategy:
- Cache tokens - Store tokens in memory or a cache with TTL
- Use refresh tokens - Both flows provide refresh tokens valid for 48 hours
- Handle 401 errors - Re-authenticate when you receive unauthorized errors
Refreshing Tokens
Use refresh tokens to obtain new access tokens without re-authenticating:
curl --request POST \
  --url https://auth.mydevices.com/auth/realms/YOUR_REALM/protocol/openid-connect/token \
  --header 'content-type: application/x-www-form-urlencoded' \
  --data 'grant_type=refresh_token&client_id=YOUR_CLIENT_ID&client_secret=YOUR_CLIENT_SECRET&refresh_token=YOUR_REFRESH_TOKEN'
Security Best Practices
- Never commit credentials - Keep Client Secrets out of version control
- Use environment variables - Store credentials in environment variables or secure vaults
- HTTPS only - Always use HTTPS to prevent token interception
- Rotate secrets regularly - Periodically rotate your Client Secret in the console
- Implement token refresh - Don't hardcode tokens; implement proper token refresh logic
- Monitor for anomalies - Track authentication failures and unusual access patterns
Troubleshooting Authentication
Invalid Client Credentials (401)
Problem: Authentication fails with "invalid_client" or 401 error
Solutions:
- Verify your Client ID and Client Secret are correct
- Check that you're using the correct realm name
- Ensure there are no extra spaces in your credentials
- Confirm your credentials haven't been rotated in the console
Wrong Authentication Type
Problem: API returns 401 or 403 even with valid token
Solutions:
- Check if you're using an admin token for user-specific endpoints (or vice versa)
- Admin tokens work only with
/v1.0/admin/*routes - User tokens are required for all other routes
- Review the User Authentication guide for user-specific endpoints
Token Expired
Problem: Previously working token now returns 401
Solutions:
- Tokens expire after 24 hours - this is normal behavior
- Implement token refresh using the refresh token
- Or re-authenticate to get a new access token
Cannot Access User Data
Problem: Successfully authenticated but cannot access a user's data
Solutions:
- Verify you're using user-level authentication (not admin)
- Confirm the user has permission to access the resource
- Check that the user account is enabled and not locked
- Ensure you're querying resources that belong to the authenticated user
Next Steps
Now that you understand authentication, explore these resources:
- Get Started with the Admin API - Complete quick start guide
- User-Level Authentication - Detailed user auth documentation
- API Reference - Complete endpoint documentation
- Example Applications - Sample code in Python and React
Support
For additional help:
- Check the API Reference for endpoint-specific authentication requirements
- Review example applications on GitHub
- Contact support for credential issues or access problems