Kerlink Network
Kerlink Network
About Kerlink
Kerlink specialises in network solutions for the Internet of Things (IoT). Its mission is to provide its clients – telecom carriers, businesses and public authorities – withetwork solutions (equipment, software and services) dedicated to the Internet of Things.
Using Kerlink with Cayenne
Cayenne makes it easy to use your LoRa device and the Kerlinketwork. You will need to:
- Setup gateway device
- Setup traffic forwarding to Cayenne
- Manually register device
- Program/Flash your device
- Add your device to your Cayenne dashboard
We will walk you through these steps in the following sections.
Setup gateway device
In order for your LoRa technology devices to connect to the Kerlinketwork, you must have purchased and configured a gateway device. Kerlink supports several different gateway devices.
- NOTE: At this time, connection between Kerlink and Cayenne is only supported with the Kerlink Wirnet Station SPN.
Be sure that you have your gateway configured and working before continuing. Your devices will not be able to properly function without your gateway device in place.
Connect to your gateway device
Adding LoRa devices and forwarding their data to Cayenne must be configured on the Kerlink gateway device. You can do so using the gateway's web interface.
Log into the gateway device.
Connect with your browser to the URL / IP Address of your gateway device.
TIP: If needed you can use a network scanner, such as the Fing app to identify devices on your network.
Possible security warning seen on connection
When connecting to your gateway device, you may find that your web browser complains about the connectionot being secure. Depending upon which browser you are using and its security settings, you may need to take actions to proceed and access the gateway content.
Connected to gateway device
As soon as you are connected to the gateway device, you will see the landing screen for your device. You can proceed with configuring the gateway to forward data to Cayenne.
Setup traffic forwarding to Cayenne
In order for data from your devices to reach Cayenne, you must configure your gateway device to forward data to Cayenne. You will need to perform this step on each Kerlink gateway device. Once logged into your Kerlink gateway interface, click on the HTTP transmitter option located in the Configuration section.
In the HTTP transmitter screen that appears, enter in the following information:
Click on the Enable checkbox to enable the fields shown here.
In the Address field enter in the uplink URL for the Kerlinketwork.
https://lora.mydevices.com/v1/networks/kerlink/uplink/Click Save to save the changes.
Your gateway is now configured to forward data to Cayenne. You can now proceed with adding devices.
Manually register device
Before you can use your device on the Kerlinketwork, it must be registered on the network. To accomplish this, devices can be added to the gateway under what Kerlink calls "Fleet devices". The following information will help guide you through this process.
Click on the Fleet option locatedear the top of the gateway menu. The Fleet screen appears and from here you can add devices.
Kerlink supports two activation modes (OTAA, ABP). In most cases, you will want to select Over the Air Activation (OTAA). Let’s cover the information needed for both methods.
Over the Air Activation (OTAA)
Below you will findotes on the fields seen for OTAA and specific notes as they relate to what needs to be selected in order to work with Cayenne.
Dev EUI: Enter the DevEUI for your device. This ID should come with the information included with your device, or can be found in the device configuration.
App EUI: Enter the AppEUI. The AppEUI is a global application ID that uniquely identifies the application provider (i.e., owner) of the device.
TIP: If you do not have an Applicate EUI, you can create one yourself. It must be a unique string composed of 16 alphanumeric characters.
App key: Enter the Appkey. The AppKey is a key specific for the end-device that is assigned by the application owner to the end-device and most likely derived from an application-specific root key exclusively known to and under the control of the application provider.
TIP: If you do not have an Applicate key, you can create one yourself. It must be a unique string composed of 32 alphanumeric characters.
Class C: Select whether orot your device operates in continuous listening mode. Ifot, leave this option unselected.
TIP: Class C is a continuous listening mode making sense for devices that are connected to the electricaletwork. In this mode the network can at anytime transmit downlink message to the device. An example of such a device is the NKE Watteco SmartPlug.
After filling in the fields for you device, click on the Add button to add the device. Once added, you will see yourew device listed on the Fleet screen.
Once your device has been created, continue by making sure that your device has been programmed/flashed.
Activation By Personalization (ABP)
Below you will findotes on the fields seen for ABP and specific notes as they relate to what needs to be selected in order to work with Cayenne.
Dev Addr: When using ABP, you will need to manually enter the hardware address here.
NOTE: Kerlink's ABP fields does not ask you to enter the Dev EUI for the device. In order to properly add a device using ABP in Cayenne, an extra step is needed. Be sure to refer to the Add your device to your Cayenne dashboard section in order to make sure that your device is properly added to Cayenne.
NwkSKey: Enter the Network Session Key. The NwkSKey is a network session key specific for the end-device. It is used by both the network server and the end-device to calculate and verify the MIC (message integrity code) of all data messages to ensure data integrity. It is further used to encrypt and decrypt the payload field of a MAC only data messages.
AppSKey: Enter the Application Session Key. The AppSKey is an application session key specific for the end-device. It is used by both the network server and the end-device to encrypt and decrypt the payload field of application-specific data messages.
Class C: Select whether orot your device operates in continuous listening mode. Ifot, leave this option unselected.
TIP: Class C is a continuous listening mode making sense for devices that are connected to the electricaletwork. In this mode the network can at anytime transmit downlink message to the device. An example of such a device is the NKE Watteco SmartPlug.
After filling in the fields for you device, click on the Add button to add the device. Once added, you will see yourew device listed on the Fleet screen.
Once your device has been created, continue by making sure that your device has been programmed/flashed.
Programming the device
Some devices will come from your device supplier preprogrammed and ready to be used immediately. Other devices will require you to program the device manually. If your device is preprogrammed, it can now be deployed and connected to the network for usage.
If your device needs to be programmed, you should now proceed with programming/flashing the device. Because this process is different for each device, you should refer to the instructions for your device for any specific information you need to perform this step. If you need help, you can refer to the Supported devices section where you will find Product page, Datasheet and User Guides for your device.
NOTE: Be sure that your device is programmed and properly connected to the network at this time. Only after your device is programmed, online and properly forwarding data should you proceed with adding your device to Cayenne.
Add device to Cayenne
Once your device has been registered, programmed, configured to forward data to Cayenne and is online, you can proceed with adding the device in Cayenne so that it appears in your dashboard.
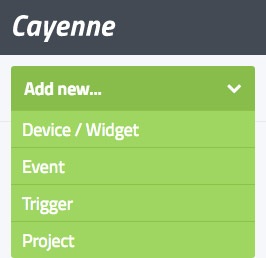
From the Cayenne Dashboard, click Add New > Device / Widget.
From the list of devices & widgets that appears, select the LoRa category and then the Kerlink Network option to view a list of supported devices.
After selecting the device that you wish to add, settings for that device will appear. In the following section, we’ll walk you through the settings needed for adding a previously registered device.
Already Registered
If your device has been previously registered on the Kerlink network, it can be quickly & easily added to Cayenne. Once added, your device and all of its sensors will appear in your dashboard.
Items you willeed:
- Which LoRa technology device is being added?
- Your device willeed to have been previously registered on the network. Refer to Manual device registration if youeed help with manually registering your device on a network.
- What is the unique DevEUI for the device being added?
To see how easy it is, let’s walk through an example of connecting an Adeunis Pulse which was previously registered on our Kerlink gateway device.
1. Choose the Network
Make sure the Kerlinketwork is selected in the list of LoRaWAN Networks.
2. Select the Device
Select your device from among the list supported the Kerlinketwork devices. In this case, we’ll select the Adeunis Pulse.
3. Enter Settings & Add device
In order to add the device, Cayenne needs to know some information about the device and how it will be shown on the dashboard.
Give the device aame. In our case, we’ll enter “LoRa Pulse” in the Name field.
Enter the DevEUI for this device into the DevEUI field.
NOTE: If your device was configured for Activation By Personalization (ABP), you will need to take a special step here - Cayenne asks for the DevEUI but this information isot currently provided with Kerlink and ABP. To work around this issue, enter in 8 zeros (00000000) followed by the Dev Addr used during the register device with ABP step on the gateway. Without performing this step, your ABP device will not work with Cayenne. This step isotecessary when using OTAA.
- Our device has been previously manually registered with the Kerlinketwork. Make sure “Already Registered” is selected in the Activation Mode field.
- Click Add device.
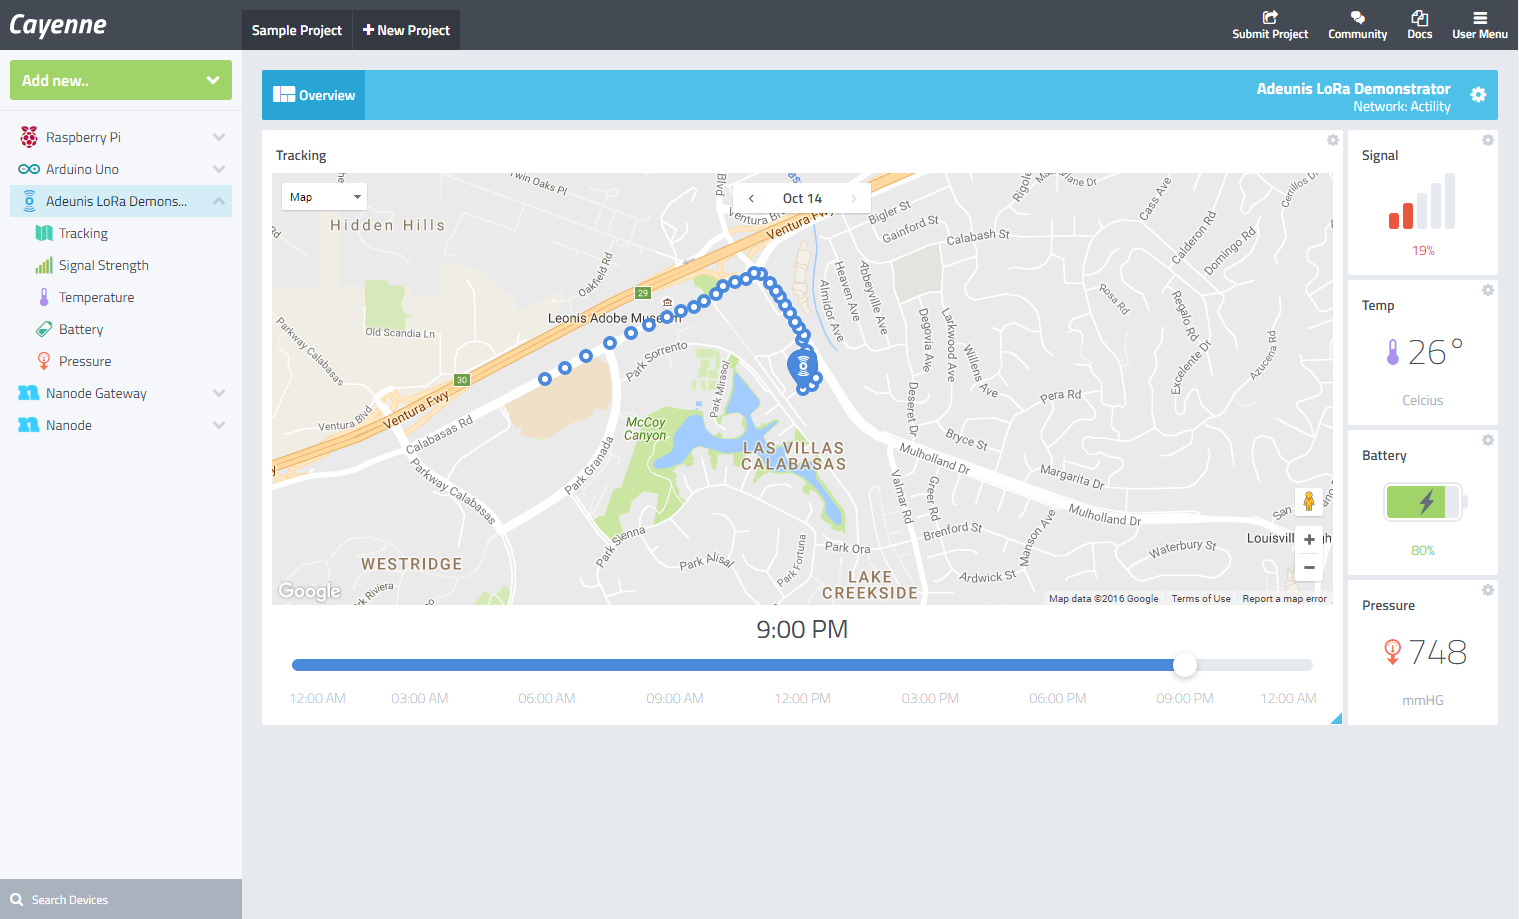
The Pulse has been added to your dashboard and Cayenne will automatically add widgets for the sensors on the device. You can now track the location of your device as well as examine the current status of the water, gas, electricity & heat sensors on the device.