Stream Network
Stream Network
About Stream
Stream Technologies is the company behind IoT-X, a Connectivity Enablement, Management & Billing platform.
Designed for all operators of Cellular, Satellite & Low Power Wide Area networks, IoT-X is offered as a Platform as a Service (PaaS) and is fast being adopted by established network operators andew entrants into the M2M/IOT sector.
Using Stream with Cayenne
Cayenne makes it easy to use your LoRa device and the Stream network. You will need to:
- Create / Log into your account on Stream's IoT-X portal
- Setup gateway device
- Setup traffic forwarding to Cayenne
- Create Application
- Register your device on the IoT-X portal
- Program/Flash your device
- Add your device to your Cayenne dashboard
We will walk you through these steps in the following sections.
Create account
To register and configure your devices to work with Stream, you will need to use Stream's IoT-X portal. To get an account with Stream and to use the IoT-X portal, you will need to work directly with Stream. Accounts areot created manually through any sign up process.
TIP: If you need help logging into your Stream IoT-X account, you can refer to Stream's Quick-Start Guide. which includes information on logging in and what to do if you need help.
Setup gateway device
In order for your LoRa technology devices to connect to the Stream network, you must have purchased and configured a gateway device. The Stream network supports a few different gateway devices. Refer to the Add a LoRa Gateway process on the IoT-X portal and to Stream's Adding a Gateway documentation. for more information.
Be sure that you have an appropriate gateway configured and working before continuing. Your devices will not be able to properly function without your gateway device in place.
Register new gateway device
If you need to register a new gateway device, you can do so from the IoT-X portal. To begin this process, log into your account and expand the LoRa side menu. Select the Gateways option to open the LoRa Gateways screen. From here, click on the Add Gateway button to begin the process of adding a new gateway.
On the Add a LoRa Gateway screen that appears, select the gateway device that you are adding and enter in the required information.
TIP: Stream has in-depth documentation on registering your gateway available if you should need help with this process.
Setup traffic forwarding to Cayenne
In order for data from your devices to reach Cayenne, you must configure the IoT-X portal to forward data to Cayenne. You only need to perform this step once globally for your account. To perform this step, expand the Services menu and select the Data Routing option. On the Device Routing Feeds screen that appears, click on the Create button to create aew device routing feed.
In the Add Data Routing Destination dialog that appears, enter in the following information:
Give the feed a Name such as "Cayenne".
Expand the Output Type dropdown and select the HTTPS POST option.
In the URL field enter in Cayenne's Stream uplink URL.
https://lora.mydevices.com/v1/networks/stream/uplink
- Click Add to complete creation of your routing feed.
Your account is now configured to forward device data to Cayenne. You can now proceed with creating an application and adding devices to it.
Create Application
The IoT-X portal groups devices in what they call Applications. Before you can add devices you must have an application.
TIP: Setting up Data forwarding to Cayenne is done globally to your account in Stream. If you already have an Application that you want to use for your devices, you do not need to create an additional application. You can skip to adding devices in that case.
To create an application, log into the IoT-X portal. and expand the LoRa side menu. Select the Applications option to open the LoRa Applications screen. Click on the Create an Application button to begin the process of adding an application.
On the Add a LoRa Application screen that appears, enter in the required information for creating aew application.
TIP: Stream has in-depth documentation on creating a LoRa Application. available if you should need help with this process.
Once you have an application that you want to use, you can then add your devices to it.
Manually register device
Before you can use your device on the Stream network, it must be registered on the network. To accomplish this, devices must be added into an Application in IoT-X portal. The following information will help guide you through this process.
- Expand the LoRa side menu. Select the Applications option to open the LoRa Applications screen.
- Click on theame of the application you want to add the device to. The screen that appears will show you the details of your application, any existing registered devices and an Add a Device panel from which you can addew devices.
Refer to the Add a Device panel on the application screen. You can enter in all the required details for adding your device directly here. The Stream network supports both OTAA and APB activation.
TIP: If you need help with this part of the process you can refer to Stream's Adding devices to LoRa Applications documentation.
- Click Add to complete adding your device.
Programming the device
Some devices will come from your device supplier preprogrammed and ready to be used immediately. Other devices will require you to program the device manually. If your device is preprogrammed, it can now be deployed and connected to the network for usage.
If your device needs to be programmed, you should now proceed with programming/flashing the device. Because this process is different for each device, you should refer to the instructions for your device for any specific information you need to perform this step. If you need help, you can refer to the Supported devices section where you will find Product page, Datasheet and User Guides for your device.
NOTE: Be sure that your device is programmed and properly connected to the network at this time. Only after your device is programmed, online and properly forwarding data should you proceed with adding your device to Cayenne.
Add device to Cayenne
Once your device has been registered, programmed, configured to forward data to Cayenne and is online, you can proceed with adding the device in Cayenne so that it appears in your dashboard.
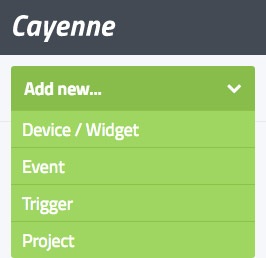
From the Cayenne Dashboard, click Add New > Device / Widget.
From the list of devices & widgets that appears, select the LoRaWAN category and then the Stream Network option to view a list of supported devices.
After selecting the device that you wish to add, settings for that device will appear. In the following section, we’ll walk you through the settings needed for adding a previously registered device.
Already Registered
If your device has been previously registered on the Stream network, it can be quickly & easily added to Cayenne. Once added, your device and all of its sensors will appear in your dashboard.
Items you will need:
- Which LoRa technology device is being added?
- Your device will need to have been previously registered on the network. Refer to Manual device registration if you need help with manually registering your device on a network.
- What is the unique DevEUI for the device being added?
To see how easy it is, let’s walk through an example of connecting an Adeunis Pulse which was previously registered under a the Streametwork account.
1. Choose the Network
Make sure the Stream network is selected in the list of LoRaWAN Networks.
2. Select the Device
Select your device from among the list of supported Stream network devices. In this case, we’ll select the Adeunis Pulse.
3. Enter Settings & Add device
In order to add the device, Cayenne needs to know some information about the device and how it will be shown on the dashboard.
- Give the device aame. In our case, we’ll enter “LoRa Pulse” in the Name field.
- Enter the DevEUI for this device into the DevEUI field.
- Our device has been previously manually registered with the Stream network. Make sure “Already Registered” is selected in the Activation Mode field.
- Click Add device.
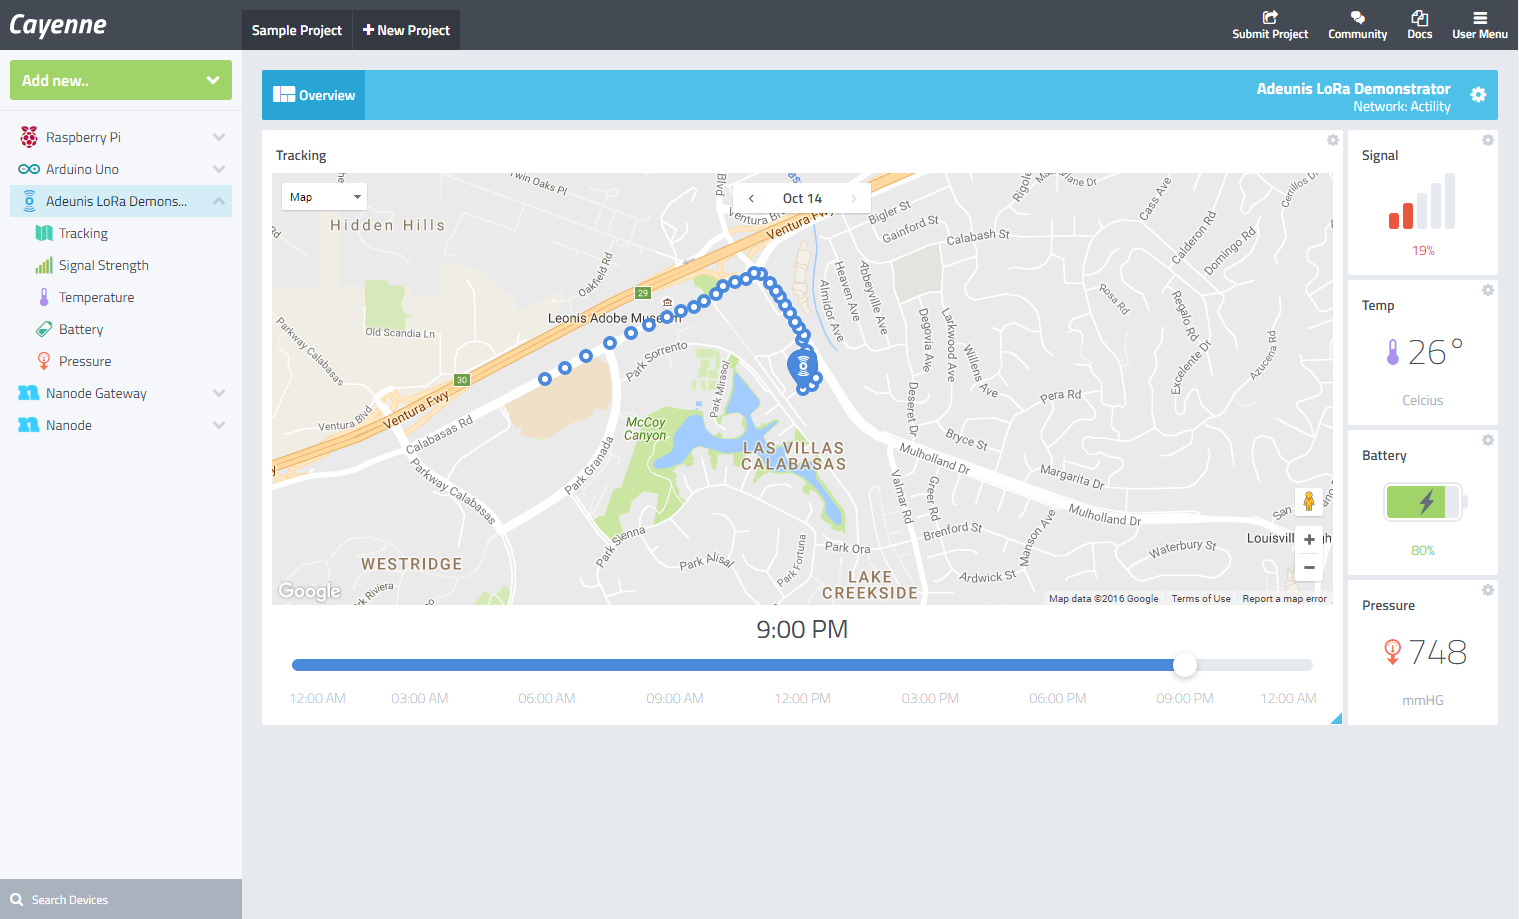
The Pulse has been added to your dashboard and Cayenne will automatically add widgets for the sensors on the device. You can now track the location of your device as well as examine the current status of the sensors on the device.